Sometimes the same item lives as several products rather than as variants of one — each colour has its own page for SEO, its own reviews, or came from a different supplier. Shoppers call it one product; your catalogue calls it a combined listing, a colour split, or just five pages that belong together. Shopify has no way to link those pages.
A product group is that link. It adds one swatch row to each member's page, so a shopper on the oak chair can click through to the walnut one without going back to the collection.
Open Product groups → Add group and you are asked how you want to build it:
Group by one option | The usual one. Products differ by a single thing — colour, size, material. |
Group by several options | Products differ by two or three things at once, and each row narrows the next. |
Build groups from your catalogue | Let the app read the groups your product titles, tags or a metafield already imply. |
Most stores start with the catalogue scan, then build the rest by hand — the groups only they could know about.
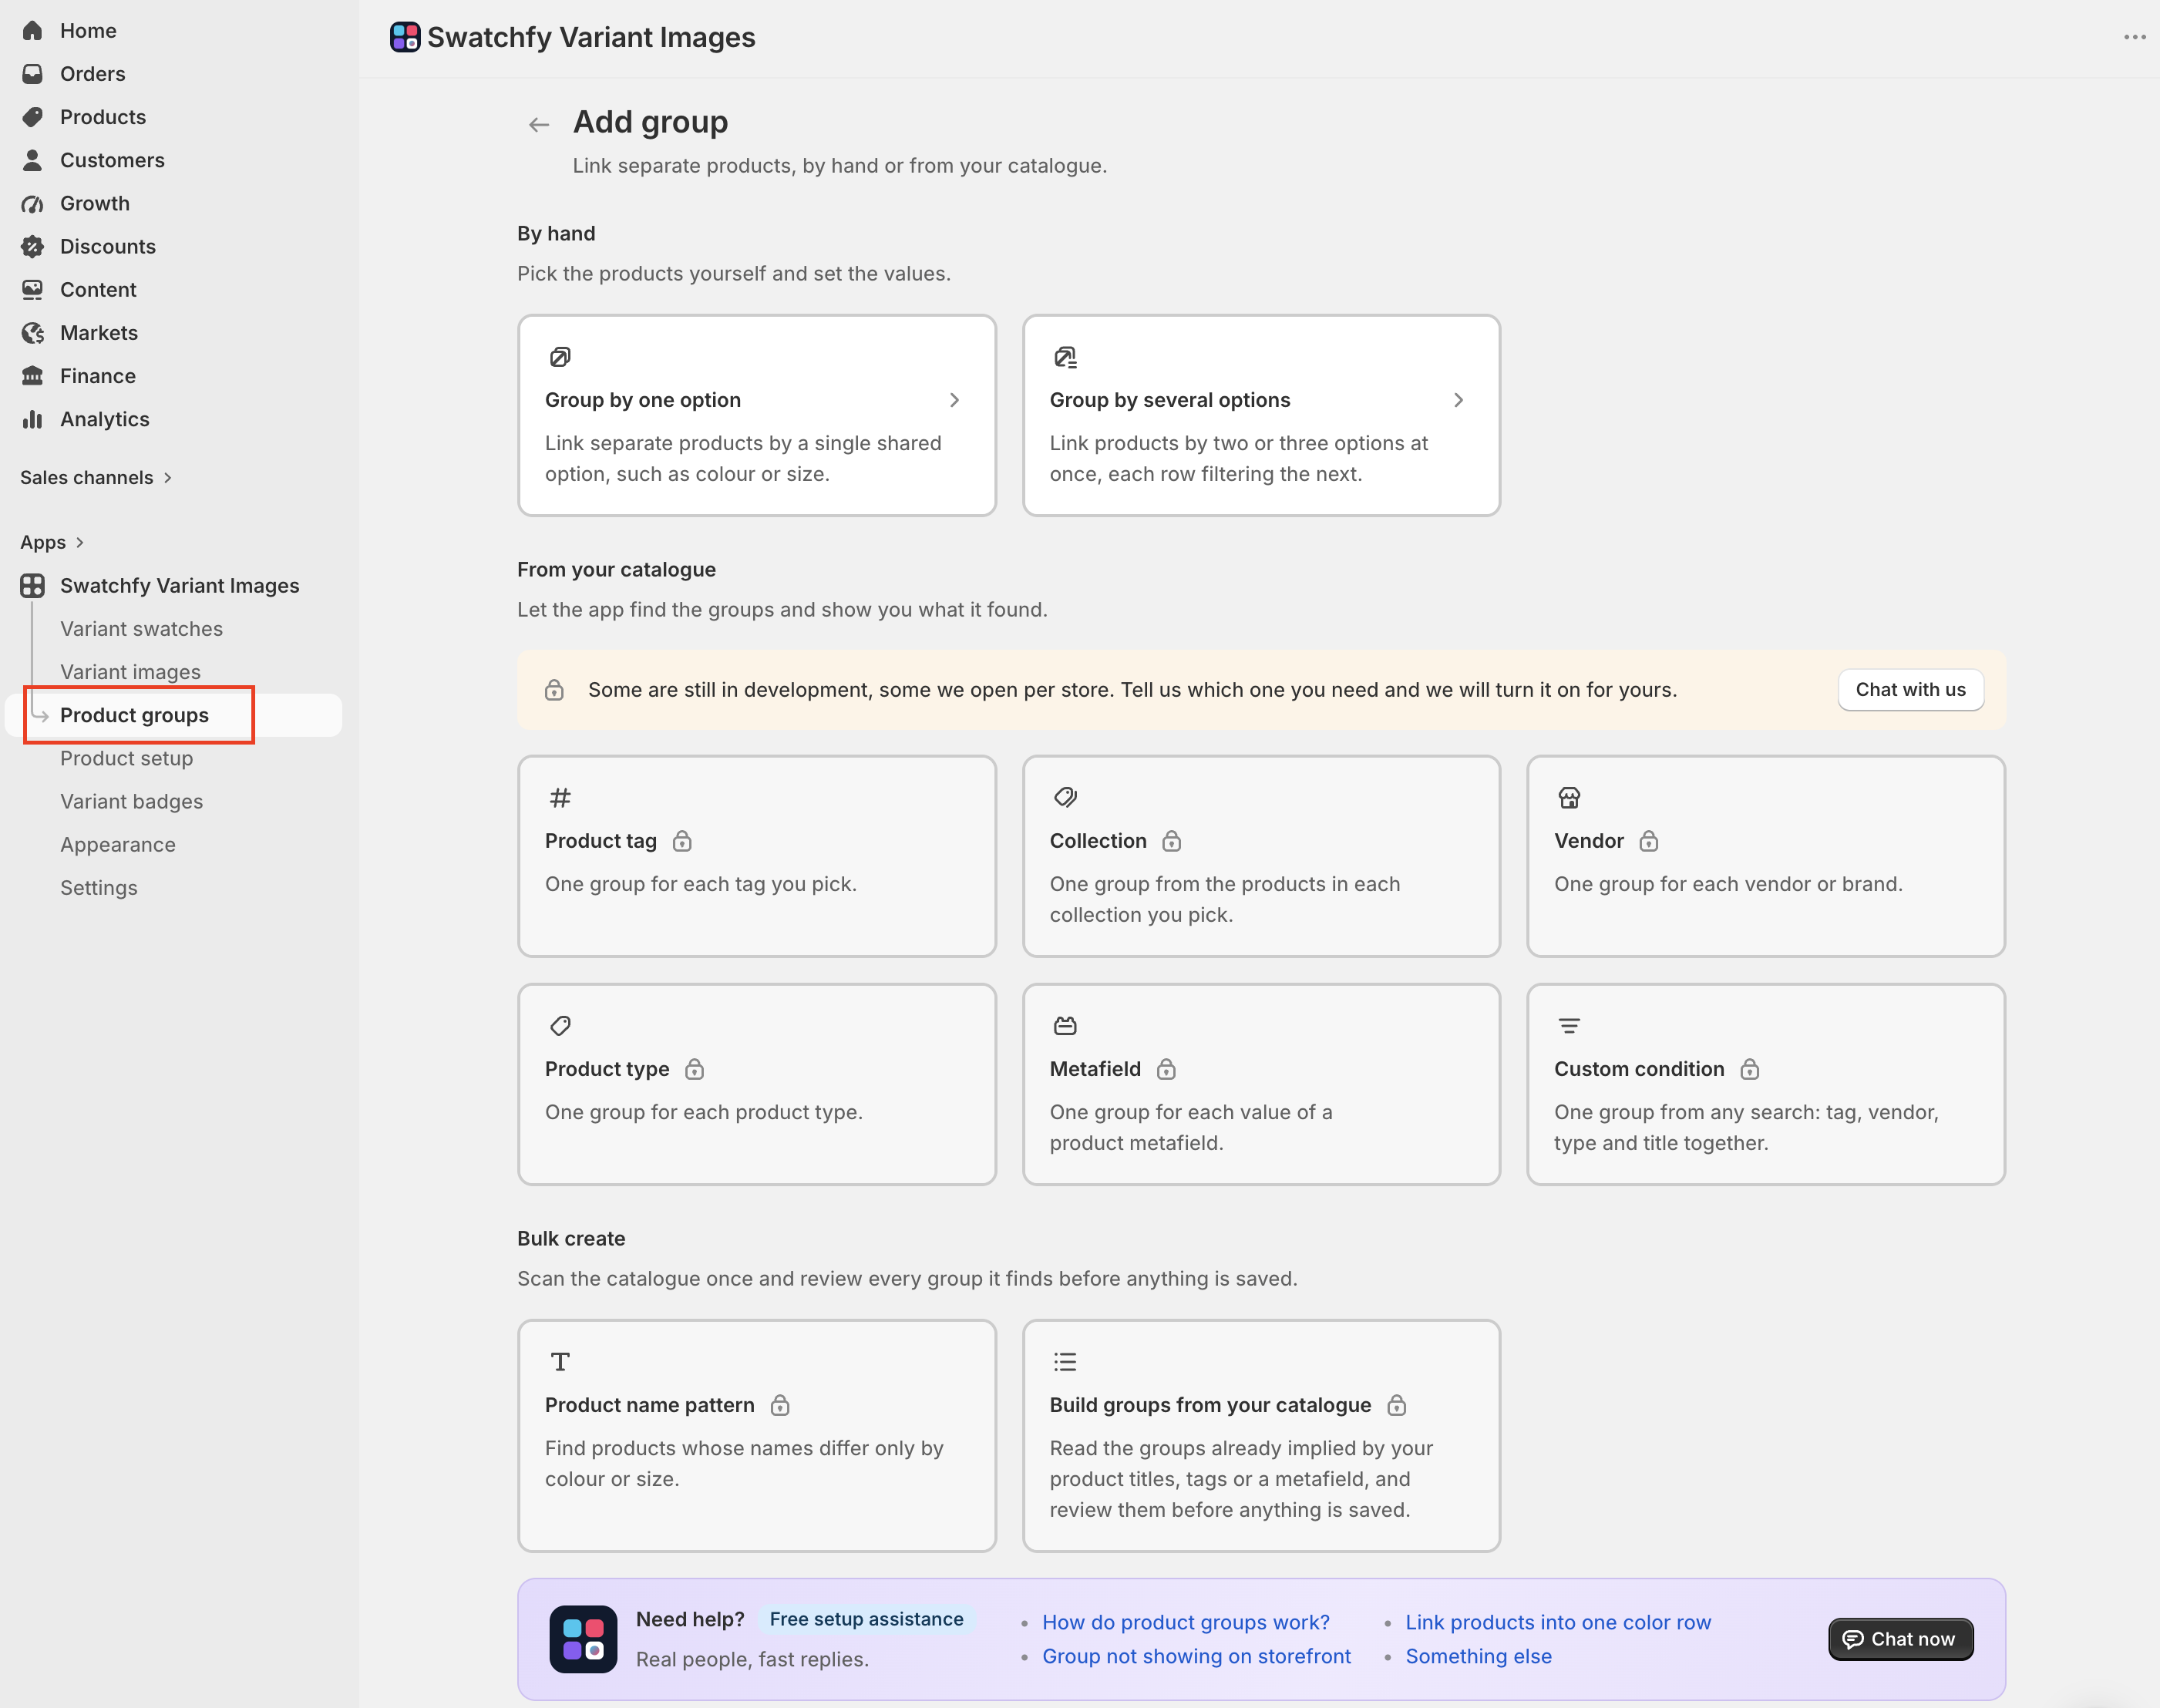
Product groups → Add group → Group by one option.
Group name — for you only. Shoppers never see it. e.g. Chair Collection
Option name — shoppers do see this, as the label on the row. e.g. Color
Add your products. A group needs at least two — with one there is nothing to link to.
Check each product's Shown as: the label on its swatch. Swatchfy fills it in from the product — its colour option value, a colour in brackets or at the end of the title, or a colour word in the title — and falls back to the product title when it finds nothing. This is what the shopper reads, so make it the value, not the title: Oak, not Dining Chair — Oak. Two products in one group cannot be shown as the same thing; the page flags it and will not save.
Drag the rows to set the order shoppers see. The handle works from the keyboard too — tab to it, Space to lift the row, the arrow keys to move it, Space again to drop it.
Save.
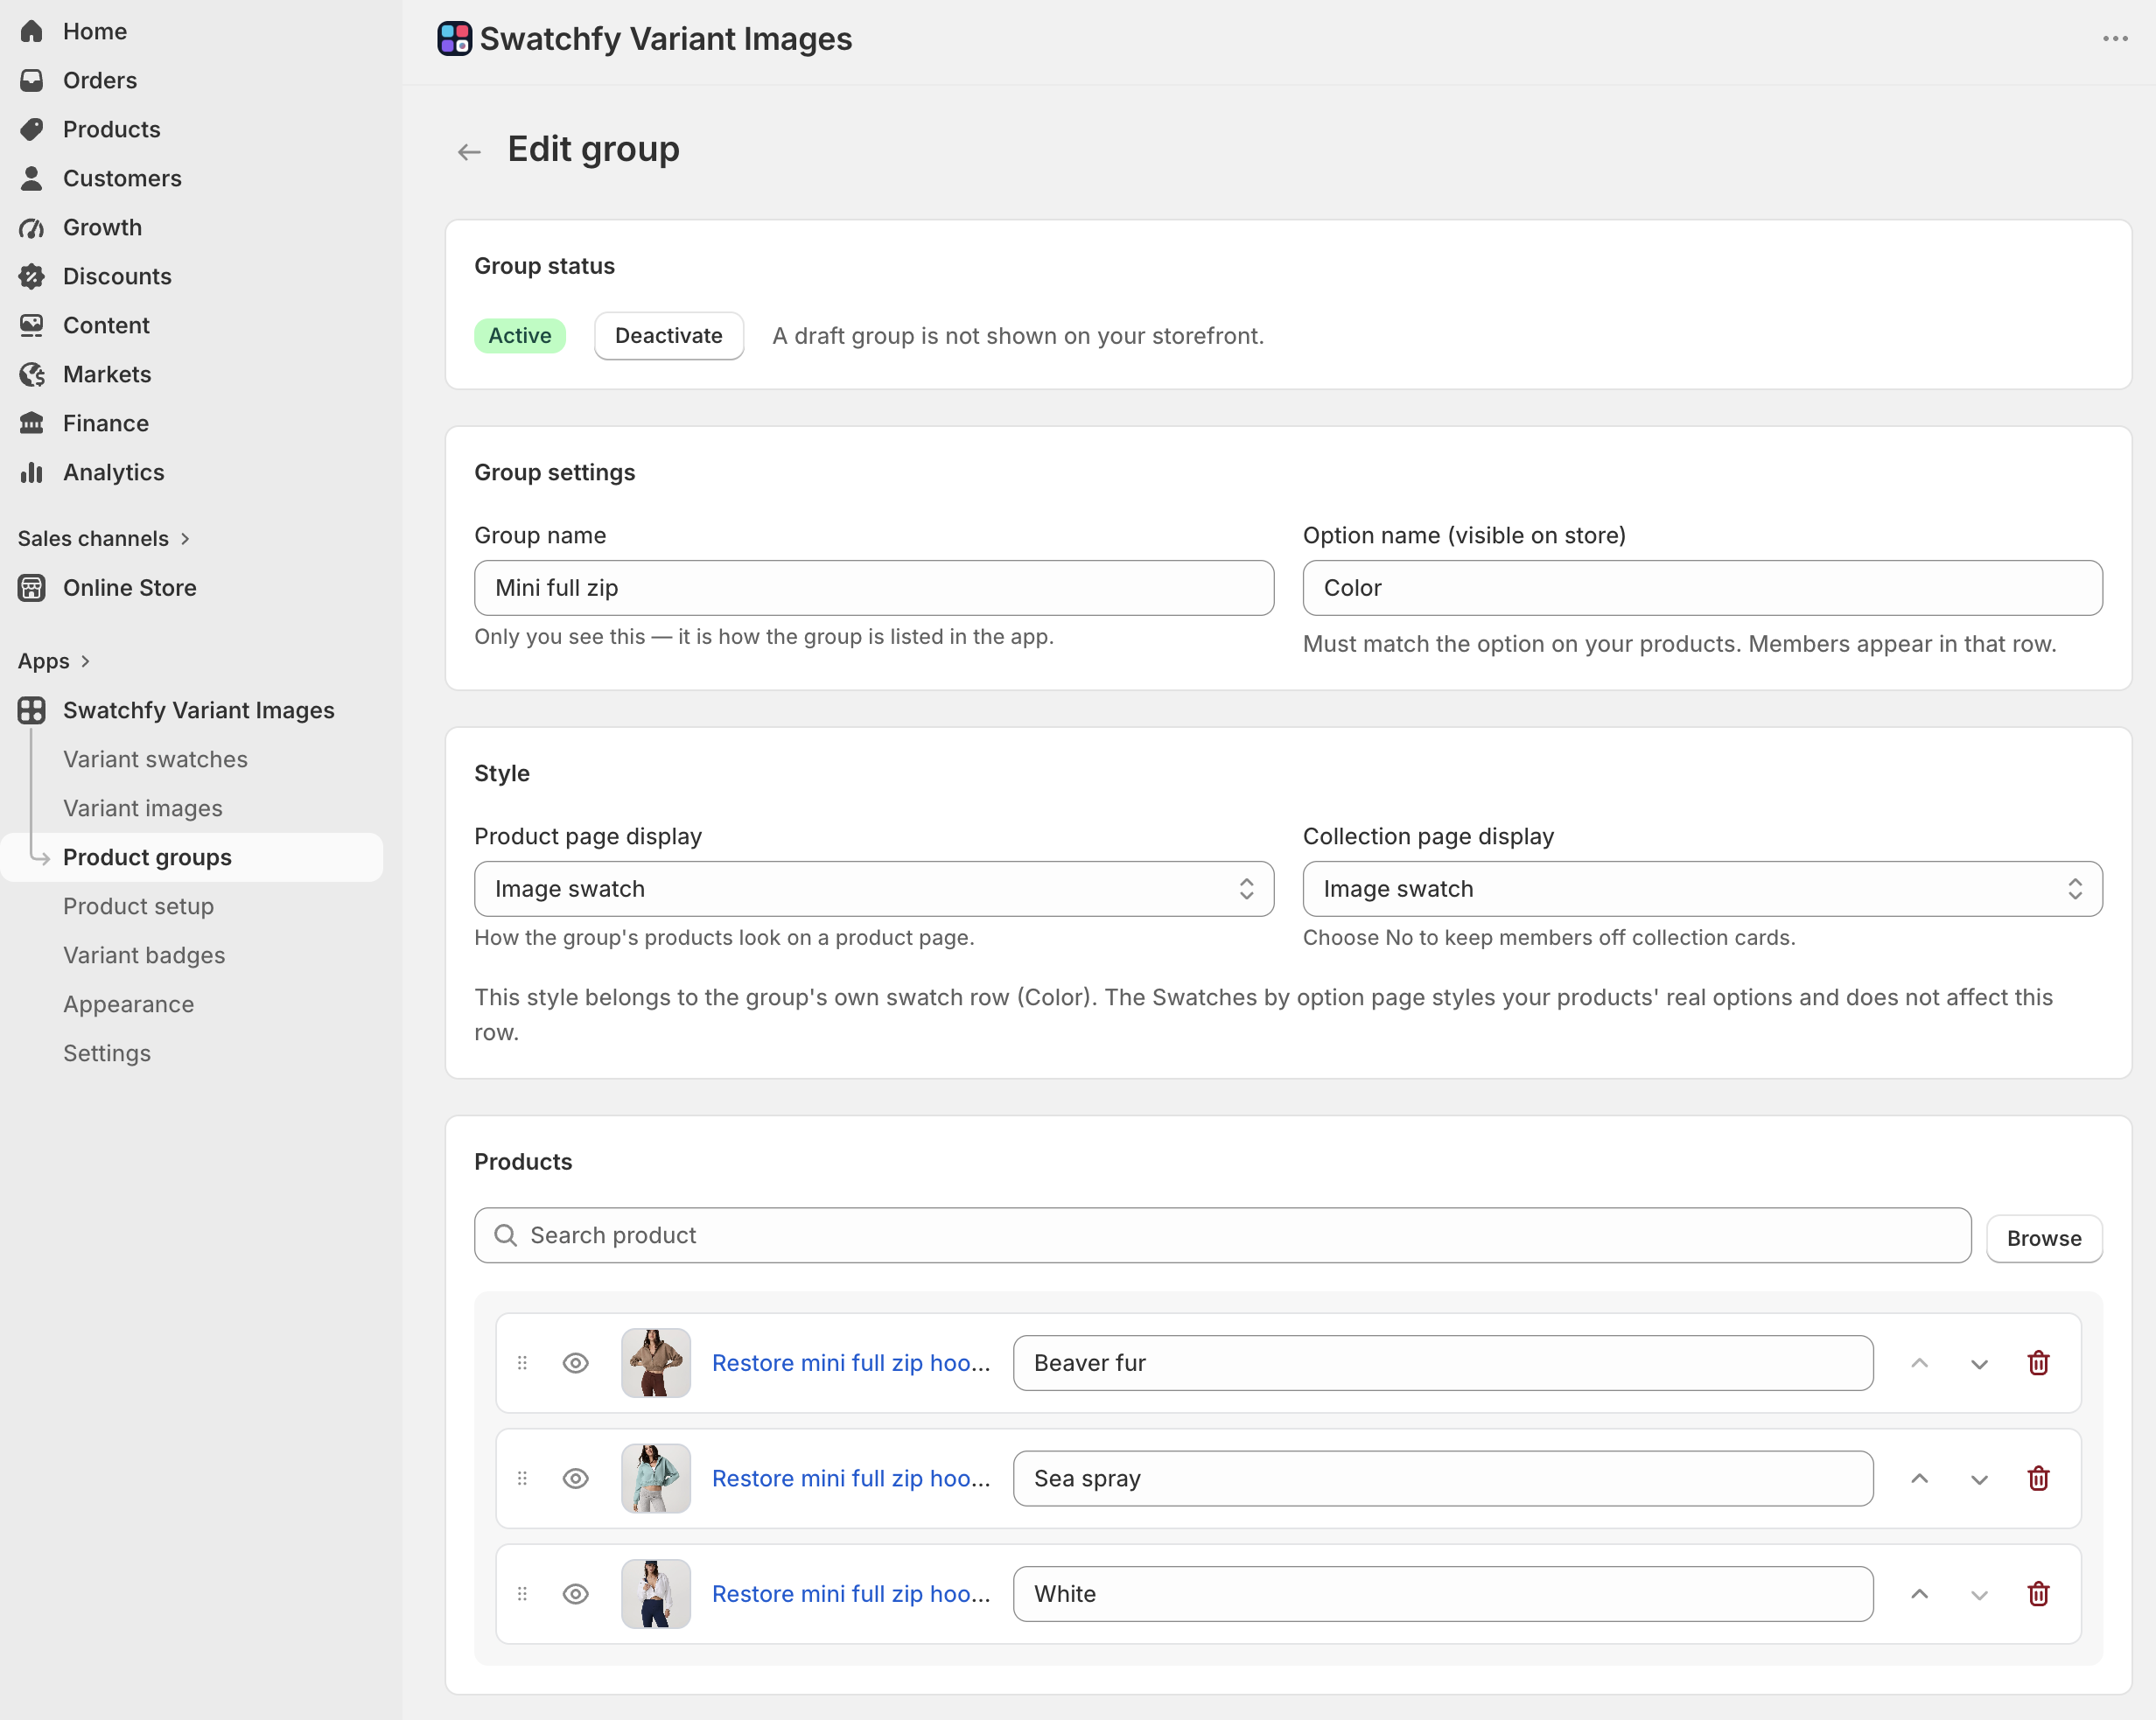
The Preview on page panel beside the form draws the row as it will appear on a product page, so you can see the result before saving.
A row is the product's swatch, its title, its Shown as value, and two buttons at the end.
Replace product swaps which product the row points at and changes nothing else — the Shown as value, its translations, the row's position and any swatch you set by hand all stay as they are. That is the point of it: when a member has been deleted or remade in Shopify, you aim the row at the new product instead of rebuilding the row. A product the group already carries is refused, because two rows pointing at one page are two swatches going to the same place.
Remove from group takes the row out altogether. The product itself is untouched.
The square at the front of the row sets that product's own swatch — see Give a value its own colour or image below.
If your store publishes more than one language, the editor's header carries Editing in. Pick a language there and every translatable field on the page switches to it at once — the option name and every product's Shown as — so one language is one pass, not one control per field. Leave a field empty in a language and shoppers on it see your default text. On a store that publishes a single language the control does not appear.
You can also hide a member without removing it from the group — useful for a product that is temporarily out of stock but coming back.
Use this when one row is not enough: a jacket sold as a separate product per colour and per size, say. You describe the options and their values, and the app lays out every combination for you to fill in.
Product groups → Add group → Group by several options.
Group name, as above.
In Option list, name your first option (Color) and list its values (Sea spray, Burnt sienna). Add a second option (Size) and list its values. Drag either list to reorder — the order is what shoppers see.
Choose Appearance on Product Page and Appearance on Product Card for each option separately. One group often wants colour swatches on one row and buttons on another.
The Products table below lists every combination. Click Choose on a row to attach the product that is that combination — the button then reads Change, and swapping a product keeps everything else on the row.
Save.
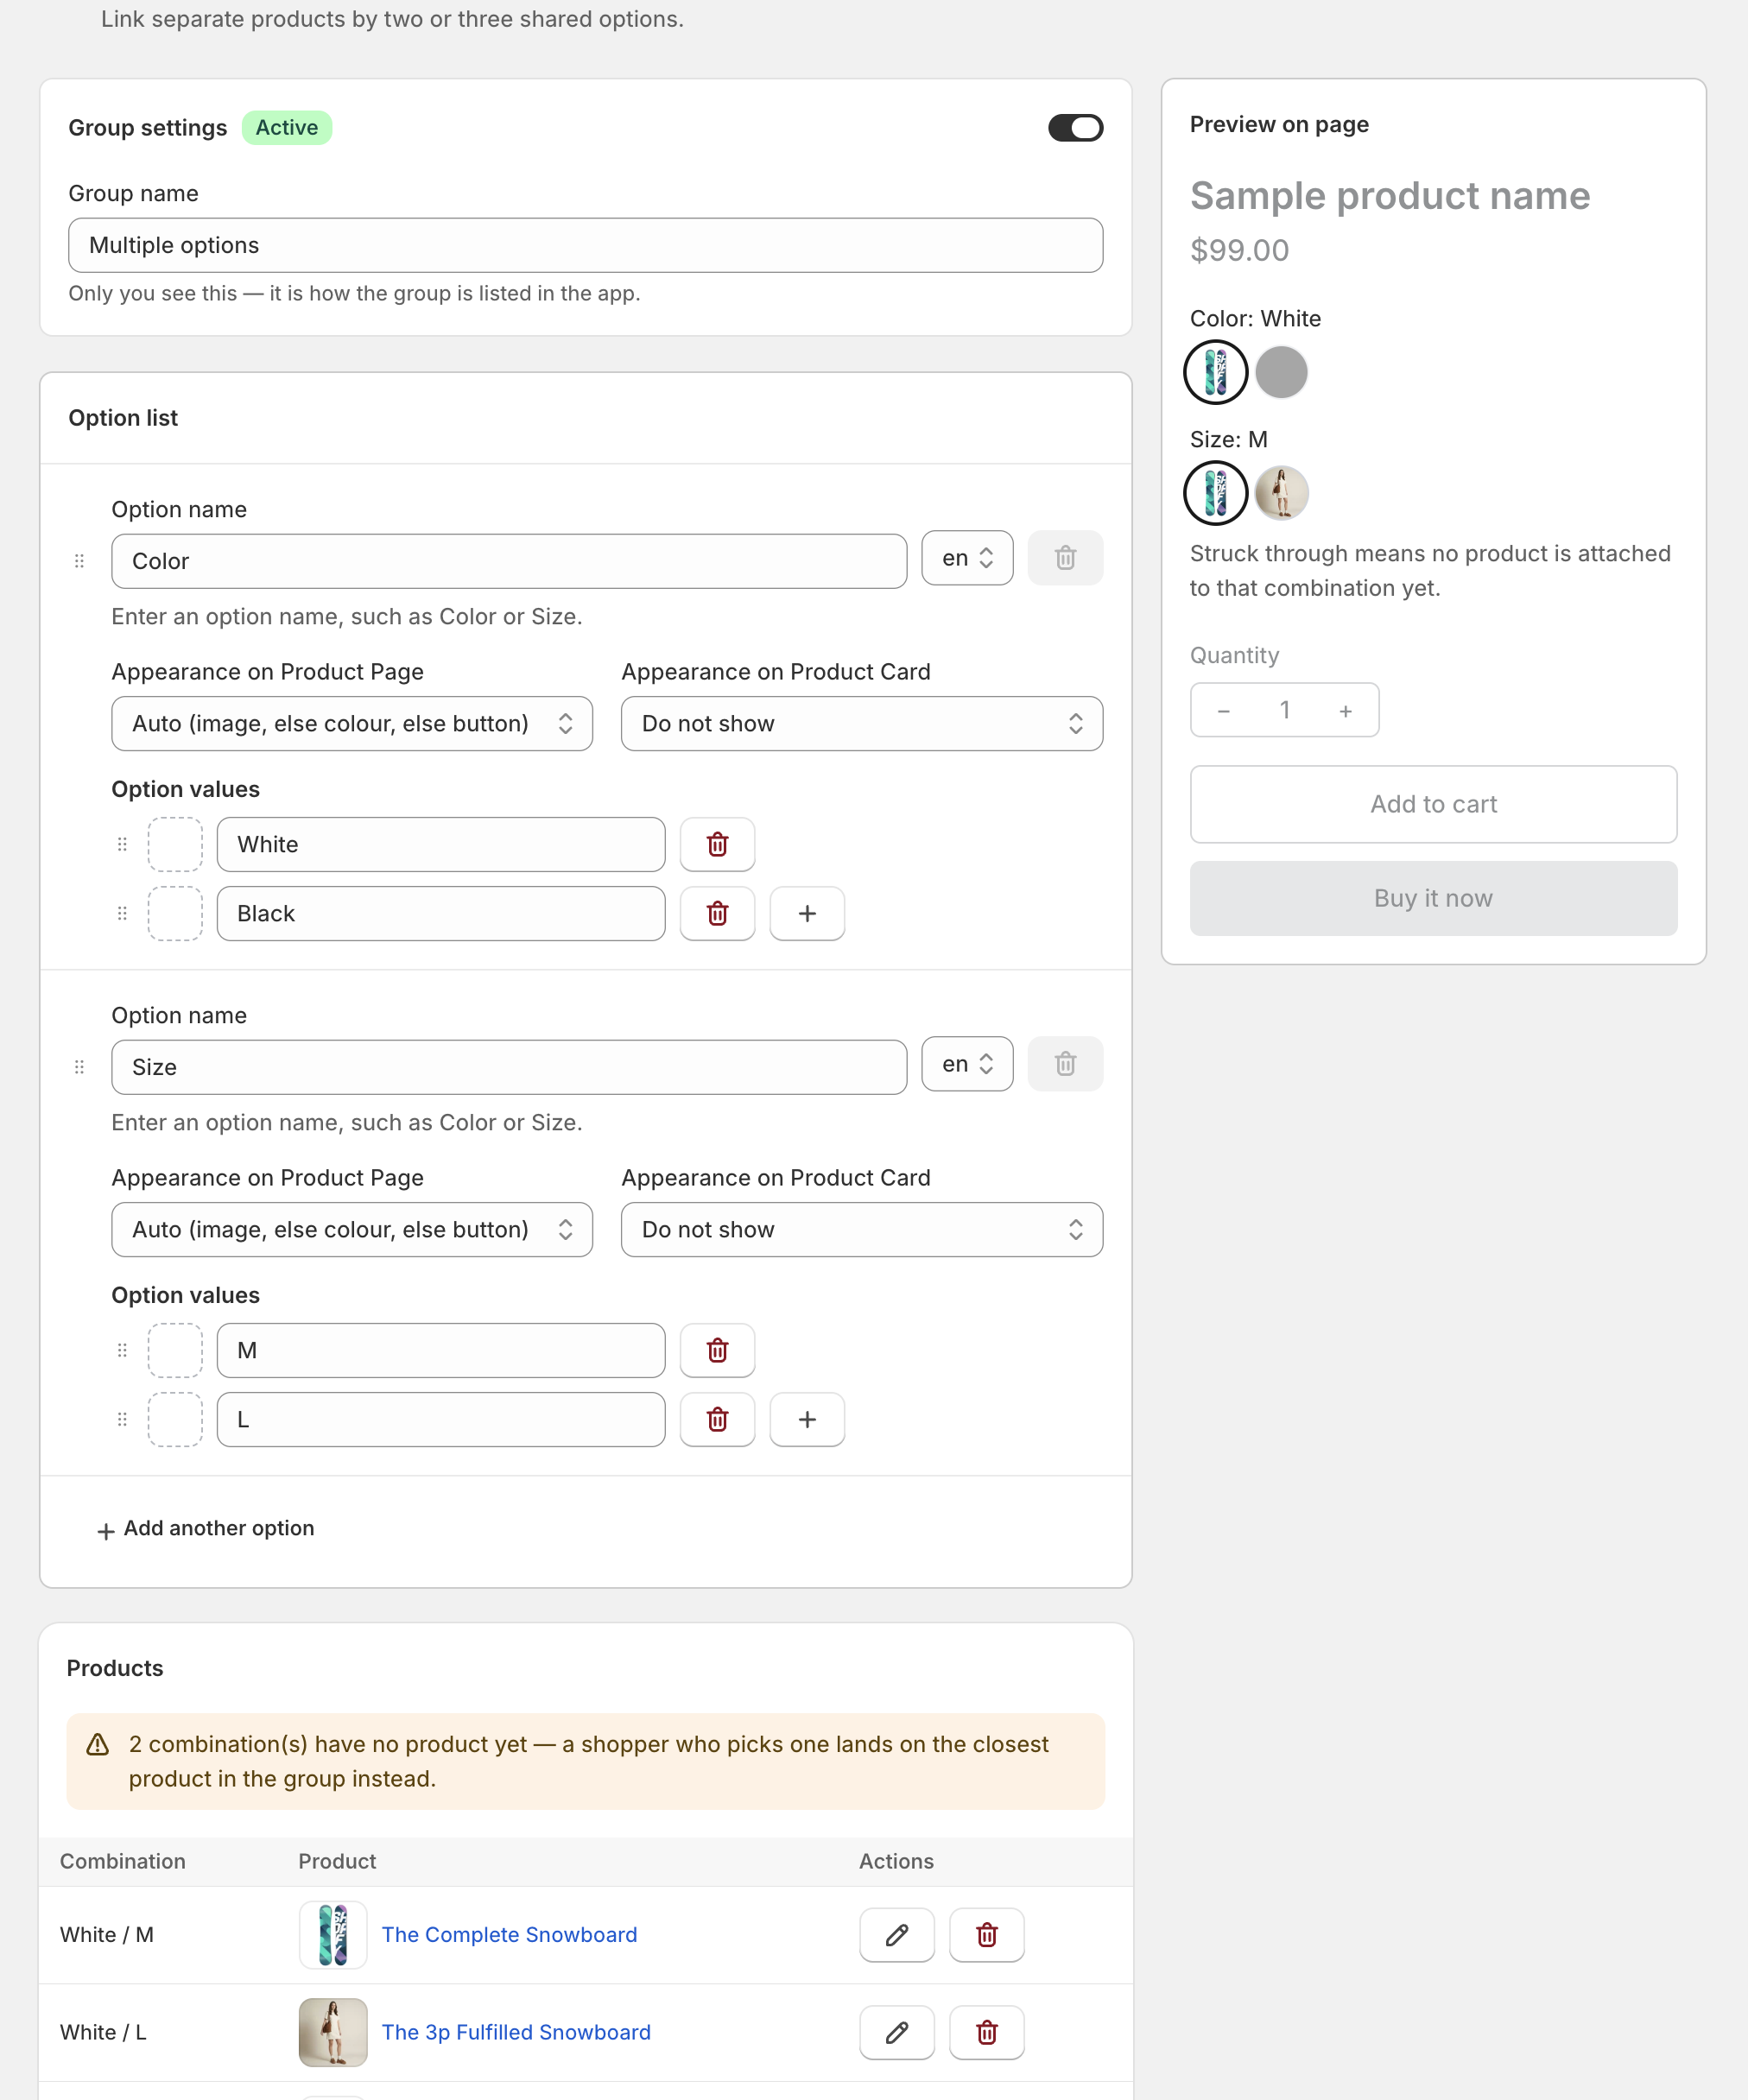
You do not have to fill in every combination, and a gap never blocks the save — a colour you never made in XS should stay empty. The editor counts the empty rows and says what happens at one: a shopper who picks that combination lands on the closest product in the group rather than on nothing. The preview strikes the value through so you can see the gaps while you work.
In Group by several options, click the square beside a value to set:
a custom image, uploaded or from a URL, or
a colour — with an optional second colour, which splits the swatch diagonally for two-tone products.
These belong to the group, not to your products: you invented the option and its values here, so nothing in your catalogue could know what Sea spray looks like. In Group by one option the same square sits on each member's row instead, because there a value belongs to one product.
Whatever you set wins over the display style — set an image on a value and it stays an image even in a colour row.
Under Colour swatch the square shows an empty + rather than the product's photo. That style never draws the photo on your storefront, so a thumbnail here would show you something shoppers will not get; under Auto and Image swatch, where the photo really is what renders, the square shows it.
If your catalogue already says which products belong together, the app can read it back.
Product groups → Add group → Build groups from your catalogue.
Choose what to group by:
Product name pattern — Dining Chair Oak and Dining Chair Walnut are one chair in two colours.
Product tags — name the tags you use for this, or leave it empty and the app reads every group: tag.
Metafield — pick a definition, or type the namespace and key. Every product sharing a value becomes one group. A product page in the Shopify admin shows a definition's name and its value, never its key: find the exact namespace and key under Settings → Custom data.
Optionally narrow the scan. It takes the same search you would type on your Products page — product_type:Sofa — and a few of your own product types and vendors are offered as examples. Leave it empty to read the whole catalogue.
Scan catalogue. Nothing is created yet.
Tick the groups you want — each row shows every member as a thumbnail with its value, and the thumbnails open the storefront page in a new tab so checking one does not cost you the list. Then click Create groups.
The scan stores nothing and never creates a group on its own. It is a proposal: it can tell that two products share a name and differ by a colour, but it cannot know that your twenty earring pages belong together, or that a bundle should not.
What it leaves out, and says so:
Products already in a group. The page tells you how many it skipped for that reason.
Products nothing tells apart. Two pages with the same title and no colour in it would give two swatches with the same label, so they are not proposed. Group those by hand.
Products that are not active.
This one is opened per store. If it shows a padlock, tell us in the chat and we will turn it on for yours.
On a product page, a group joins your product's own swatch row when it can, and takes a row of its own when it cannot:
If the matching option on your products carries one value — the usual shape, where Colour exists only to name that product — the group's swatches join that row. You get one row, not two.
If the option is a real picker with several values of its own, the group gets its own row above it. Those are two different questions — which product and which variant of it — and they should not share a row.
Name the group something your products do not use at all and it always renders as its own row.
To put that row somewhere specific — above the price, under the description — add the block and drag it:
Online Store → Themes → Customize.
Open your product template and click Add block in the sidebar.
Under Apps, choose Swatchfy Product groups.
Drag it to where you want the row to appear.
Save.
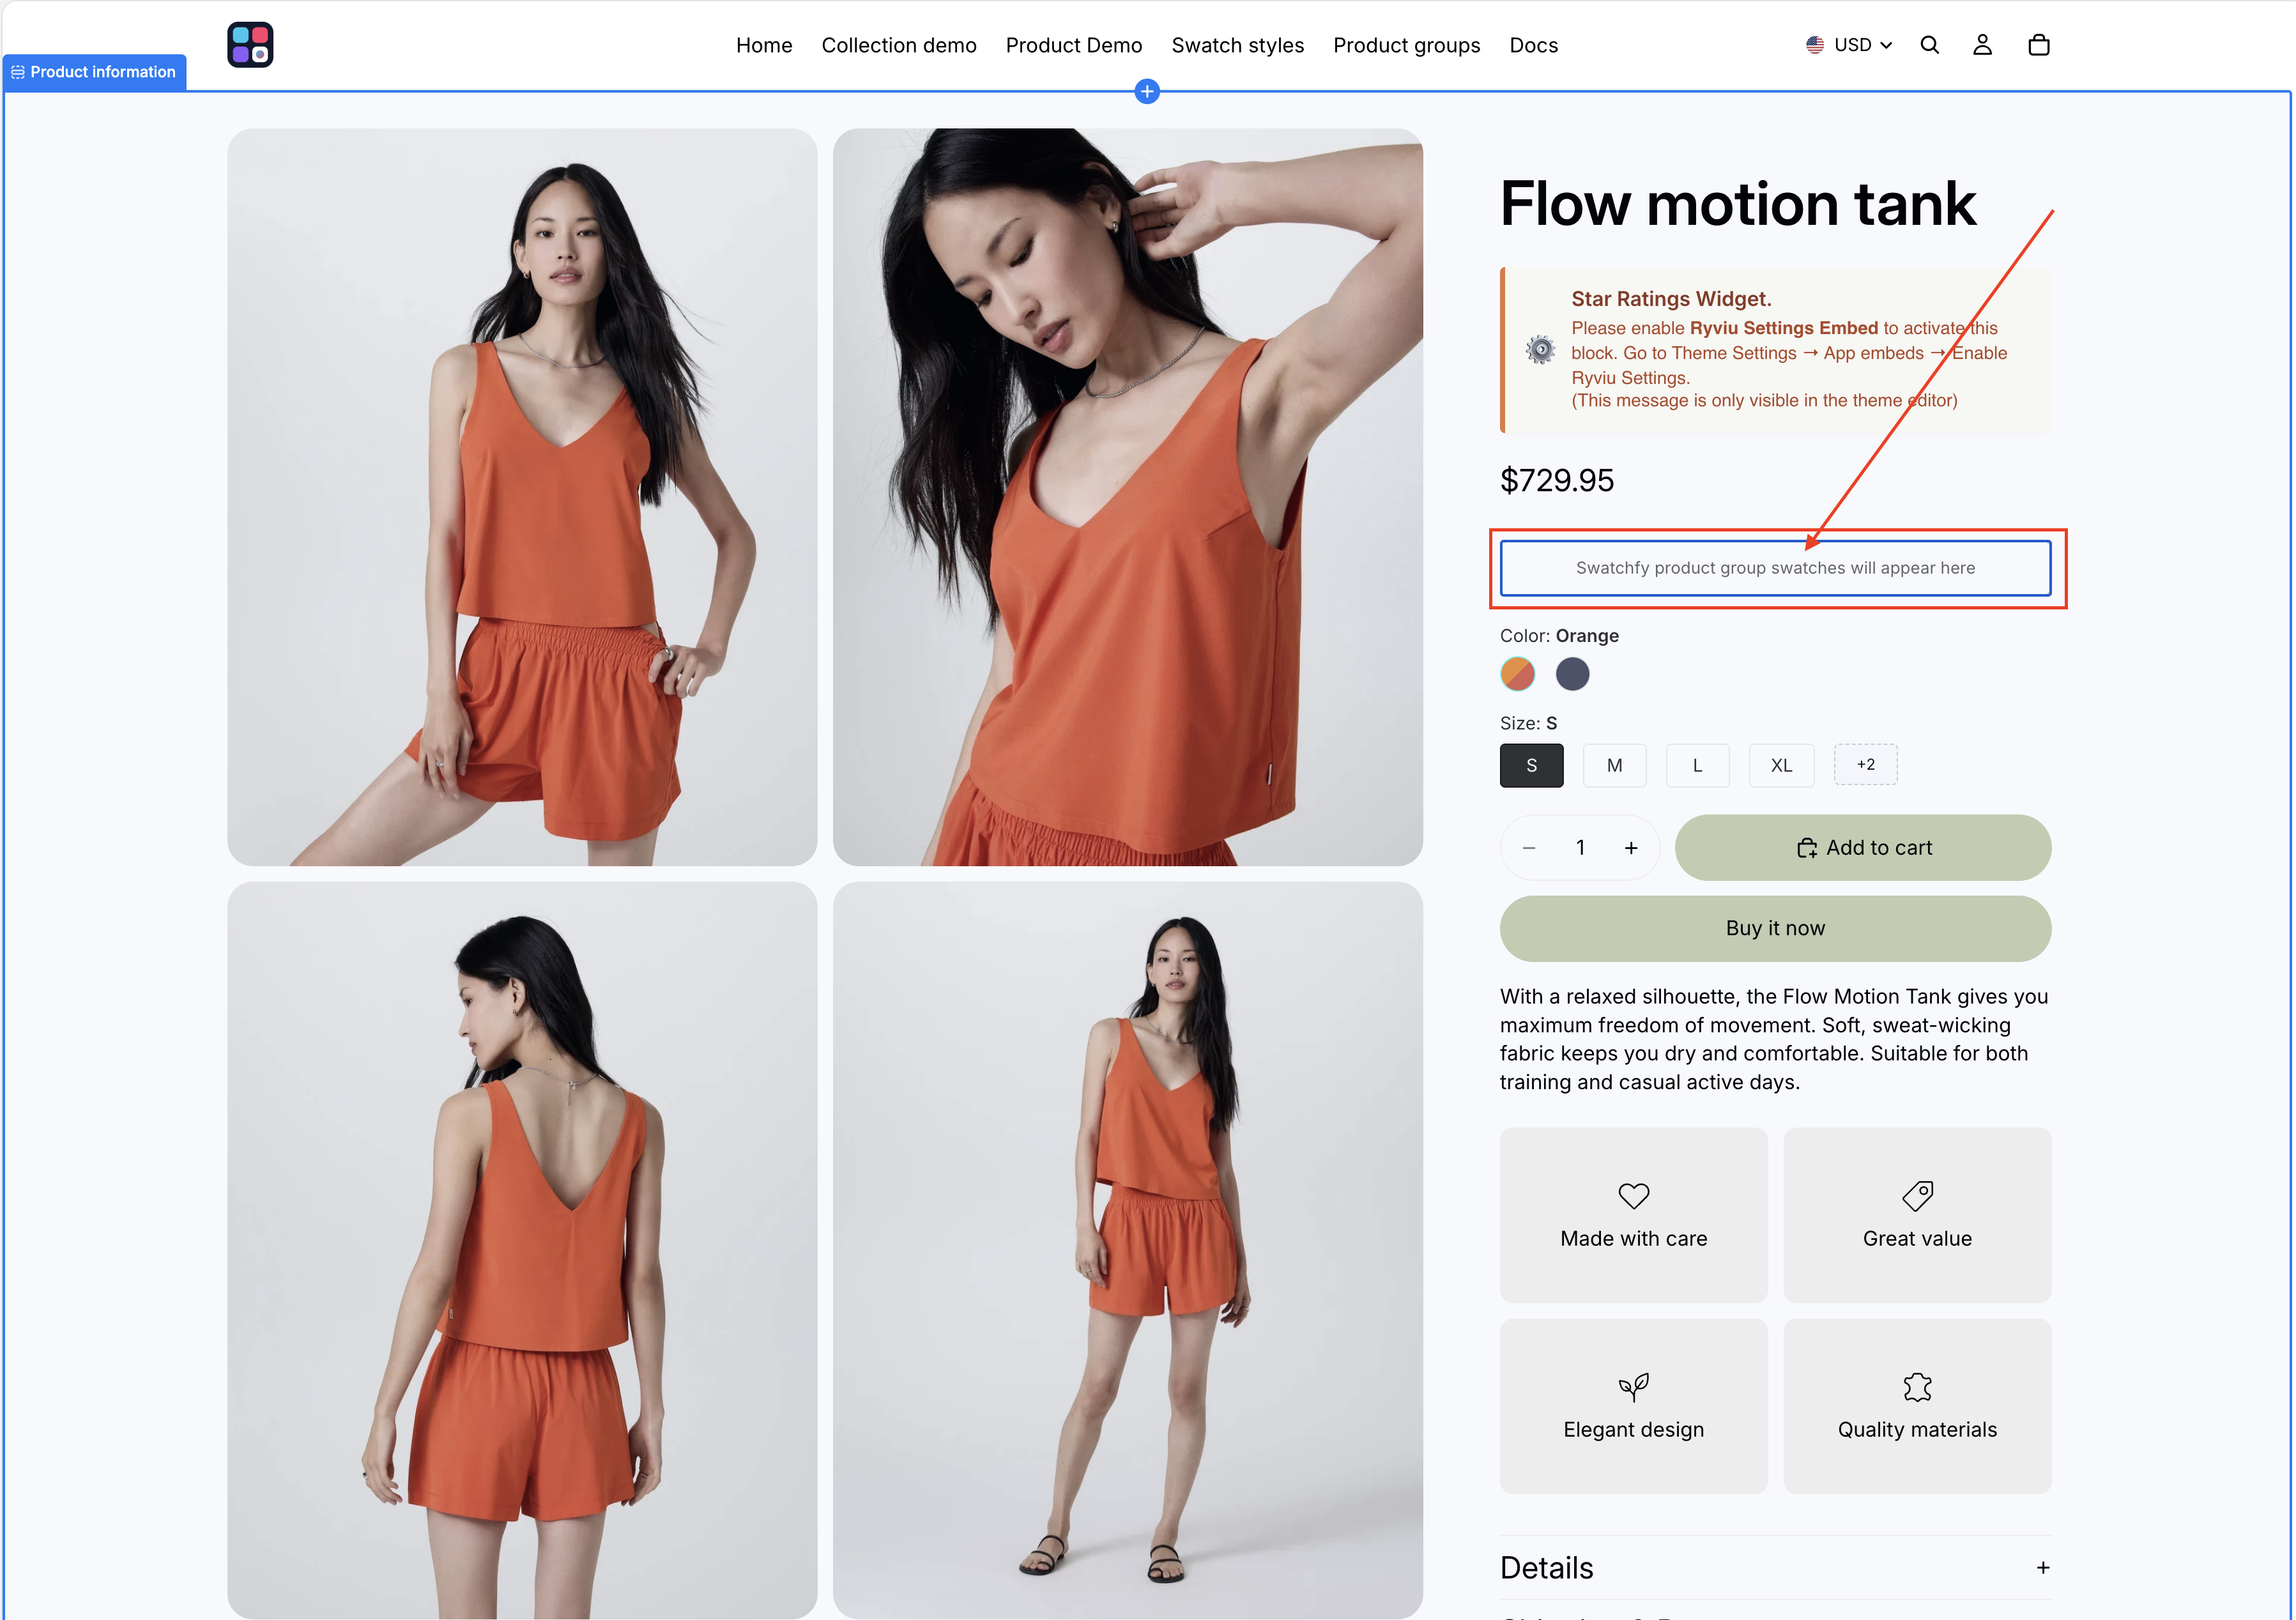
On collection pages and anywhere else products appear as cards, the row places itself by default. If your theme lets you add blocks inside the product card — newer themes such as Horizon do — you can place it exactly instead:
In Customize, select the section holding the cards and open Product card in the sidebar.
Add block → Apps → Swatchfy Card swatches.
Drag it where you want it — under the price, say.
Save.
This block needs the Swatchfy Variant Images app embed switched on (Customize → App embeds), which is what loads the app on a collection page.
No CSS and no theme code — the position is whatever you drag it to.
Product page display and Collection page display are set separately. Each offers the same five choices:
Do not show — keep the group off that surface entirely
Auto — image if there is one, else colour, else a button
Image swatch · Colour swatch · Button
So hiding the group is not a separate switch: choose Do not show on the surface you want it off. You can run a group on product pages only, on collection cards only, or on both with a different look on each — a small image swatch on the busy collection grid, a labelled button on the product page.
This style belongs to the group's own row. The pages that style your products' real options do not affect it.
A group's status is Active or Draft. A draft group is not shown on your storefront, so you can build and reorder it without shoppers seeing half-finished work.
A group stores the product as it was when you picked it, and Shopify does not tell the app when that changes. So Swatchfy reads every member back from your catalogue each time you open the group list or a group, and flags the two ways a swatch stops working:
No longer in your catalogue — the product was deleted.
Not published — the product still exists but shoppers cannot reach it, so its swatch would link to a page that does not open. Note that the usual way of taking a product off your store, unticking the Online Store sales channel, leaves it Active in Shopify — the app still flags it, because the question is whether the page opens.
Both badges appear in Group by one option and in Group by several options, on the row that carries the product. Use Replace product to point the row at another product, or remove it.
You do not have to open a group to find out: on the Product groups list, a group carrying either kind is badged 2 product(s) unavailable beside its name.
While the app is reading your catalogue it also refreshes what it stored: a member you renamed in Shopify stops linking to its old URL, and a member whose photo you swapped stops being drawn with the old one — without you saving the group again.
If your grouped products are single-variant, there is no variant picker on the page for the row to attach itself to, so nothing renders on its own. Here the Swatchfy Product groups block above is not optional — it is the only thing that puts the row on the page.